Showing posts with label unity. Show all posts

Monday, March 21, 2016

Unity 5.3 + Leap: A Look at Orion

A while ago I posted a demo about raising your hand to get a character's attention using the Leap motion.  I was asked recently to take a second look at this demo as the code in that example appears to no longer work using Leap Motion's Orion release. I had not downloaded Orion yet, so this seemed like a good excuse to do so.

After updating everything, I took a look at one of the featured examples, Blocks and my first impression was quite good. This was by far the best hand tracking I have experienced with the Leap.  Thumbs up for sure.

Next I started assembling my own scene to see if I could get the Orion hands to display. I created a new project, set the project build settings for VR (Edit > Project Settings > Player, then ensured that Virtual Reality Supported was checked), and created  a basic scene with plane, a cube, and a directional light.  After importing the  LeapMotion_CoreAsset_Orion_Beta_4.0.1 package, from the LeapMotion assets, I dragged the Prefab > LMHeadMountedRig into the scene.


I gave it a quick test run, but no hands. I quickly realized that I had not followed steps 4 and 5 of the setup guide  to properly add the hand models, both to the scene and to the Hand Pool script attached to the LeapHandController.


After adding the hand models, I gave it a test run and I had hands in the scene.


Now back to the original question, could I  replicate the hand waving demo I created for my earlier post using Orion. In that demo I had a single character idling, minding his own business who, when the user raises their hand,  waves back with a speech bubble appearing saying “Hello, there!”.

I next added a rigged character and the speech bubble.  For the character motion  I used the same animation and animation controller as in the previous demo.


Finally I imported the wavehello.cs script.  After importing the wavehello.cs script, the first error I needed to address was that the namespace name HandController could not be found.

From the short example posted in the setup guide, it appears that the HandController has been replaced by LeapProvider.

The note on that page, says
" In almost every case, you should get Frame objects from the scene’s LeapProvider object. The LeapProvider transforms the frame data into the proper frame of reference. If you get a frame from the Leap.Controller object, the data will still be in the Leap Motion frame of reference and will not match the hands displayed in the scene."

To that end,  the next step was to create a Frame object and  get the CurrentFrame.

Frame frame = provider.CurrentFrame;


Then to get the hands, I looked for each Hand object in the frame.

foreach (Hand hand in frame.Hands)

And just as I did before, I looked at the Y position for each Hand object, and compared it to the Y position of the CenterEyeObject. To simplify things a bit, I only looked at the right hand (hand.isRight) so that I don't need to account for the situation where one hand is up and one hand is down.

The other change from the old script here is that you no longer use the GetPalmPosition() method and instead simply use hand.PalmPosition.y. Here is the  new Update function:


void Update()
{

  // Get the current frame.
  Frame frame = provider.CurrentFrame;

  foreach (Hand hand in frame.Hands){
    if (hand.IsRight){

      if (hand.PalmPosition.y >= centerEyeAnchor.transform.position.y - 0.03f){
        anim.SetTrigger("Wave");
        changeMenuDisplay(speechbubble, 1);
        Debug.Log("Hand above");
      }else{

        anim.SetTrigger("Idle");
        changeMenuDisplay(speechbubble, 0);
        Debug.Log("Hand below");
      }

    }
  }
}


The new script is on GitHub.  


Sunday, November 1, 2015

LEAP Motion 3D Jam Entry

I'm working on an entry for the Leap Motion 3D Jam. The Earth Elevator is an educational VR experience where you take an elevator to the center to the earth. The elevator makes several stops along the way to provide you with information about each layer and time to look around.


This project builds on other work I've covered on this blog in these posts:  Using Unity native VR,  Re-centering the avatar and knowing when the health and safety warning has been dismissed, Seeing your hands in VR , Hand selection UI prototype,  Raising your hand, and Thought bubbles in a Rift scene using world space canvases.

This demo requires a Rift DK2, a LEAP Motion, Windows 8 or later, and Oculus Runtime 0.7.  If you want to try it out, you can download it from the 3D Jam web site.

I'm considering adding a table with samples from each layer that you can pick up and look at a bit more closely. Don't know if I can get it done in time for the jam, though.

Thursday, October 1, 2015

Unity 5.2.1: Three quick tips for improving the VR user experience

For demos that I work on, there are three simple things that I always do to create a better user experience:
  • make sure the Oculus health and safety warning (HSW) has been dismissed before any other information is displayed
  • give the user the option to re-center their avatar after they’ve put the headset on and settled in a comfortable position
  • encourage the user to create a profile

If you are a regular reader of this blog, you know this isn't the first time I've covered these topics. However, now that Unity includes native VR support I wanted to revisit these tips and show how to do them with Unity 5.2.1, the 0.7 runtime, and the Oculus Utilities for Unity 0.1-beta package.

Knowing when the HSW has been dismissed

The HSW is a big rectangle centered in front of the user. While it is semi-transparent, it blocks the user’s view significantly. For that reason, I like to make sure that is has been dismissed before displaying anything the user needs to interact with.

The Oculus Utilities for Unity 0.1-beta package provides a way to check to see if the HSW is still displayed:

OVRManager.isHSWDisplayed

This returns true when the HSW is displayed and false when it is not. Note that if you are running the application in the Editor, you won't see the HSW in the Editor window, however, the HSW will appear in the Rift view.

Re-centering the avatar

It is helpful to give users the option to re-center their virtual selves and this is one of the functions available as part of the Unity native VR implementation. 

 To re-center, add the VR name space and use:

VR.InputTracking.Recenter()

Encouraging the user to create a profile

If the user has not created a profile, the user may experience discomfort because the default IPD or height is different from their own. In previous versions,  you could get the name of the profile in use, and if the name returned was "default," you would know that the user had not created a profile. Unfortunately, I’m not seeing a way to do that with the Oculus Utilities for Unity 0.1-beta package. I tried  using OVRManager.profile.username, but it returns "Oculus User" and not the name from the user profile. Looking at OVRProfile, it appears that only ipd, eyeHeight, and eyeDepth are retrieved from the current user profile (Note: you can get the user's eye height and IPD  using OVRManager.profile.eyeHeight and OVRManager.profile.ipd.)

For now, I’ll just stress the importance of creating a profile in the documentation. If anyone knows how to get the current user name, please comment!

Friday, September 11, 2015

Quick Look: Using Unity 5.2 native VR support to create a scene for the Rift

Unity 5.2 came out before I had time to write a 5.1 native VR post. With the book out,  I can now get back to writing blog posts. Here's what happened when I took a look at using Unity 5.2 native VR support to create scenes for the Rift.

I downloaded Unity 5.2 and gave it a quick trial run with the DK2, the Oculus Runtime 0.7.0-beta, and the Oculus Utilities for Unity 5 0.1.0-beta package. As you might have guessed from the runtime version, this test was Windows only. To test it all out, I built a quick sample scene using assets found in the Unity standard asset packages, enabled native VR to get the scene on the Rift, added a player character, and then did a test build and run.

Enabling VR and getting the scene on the Rift

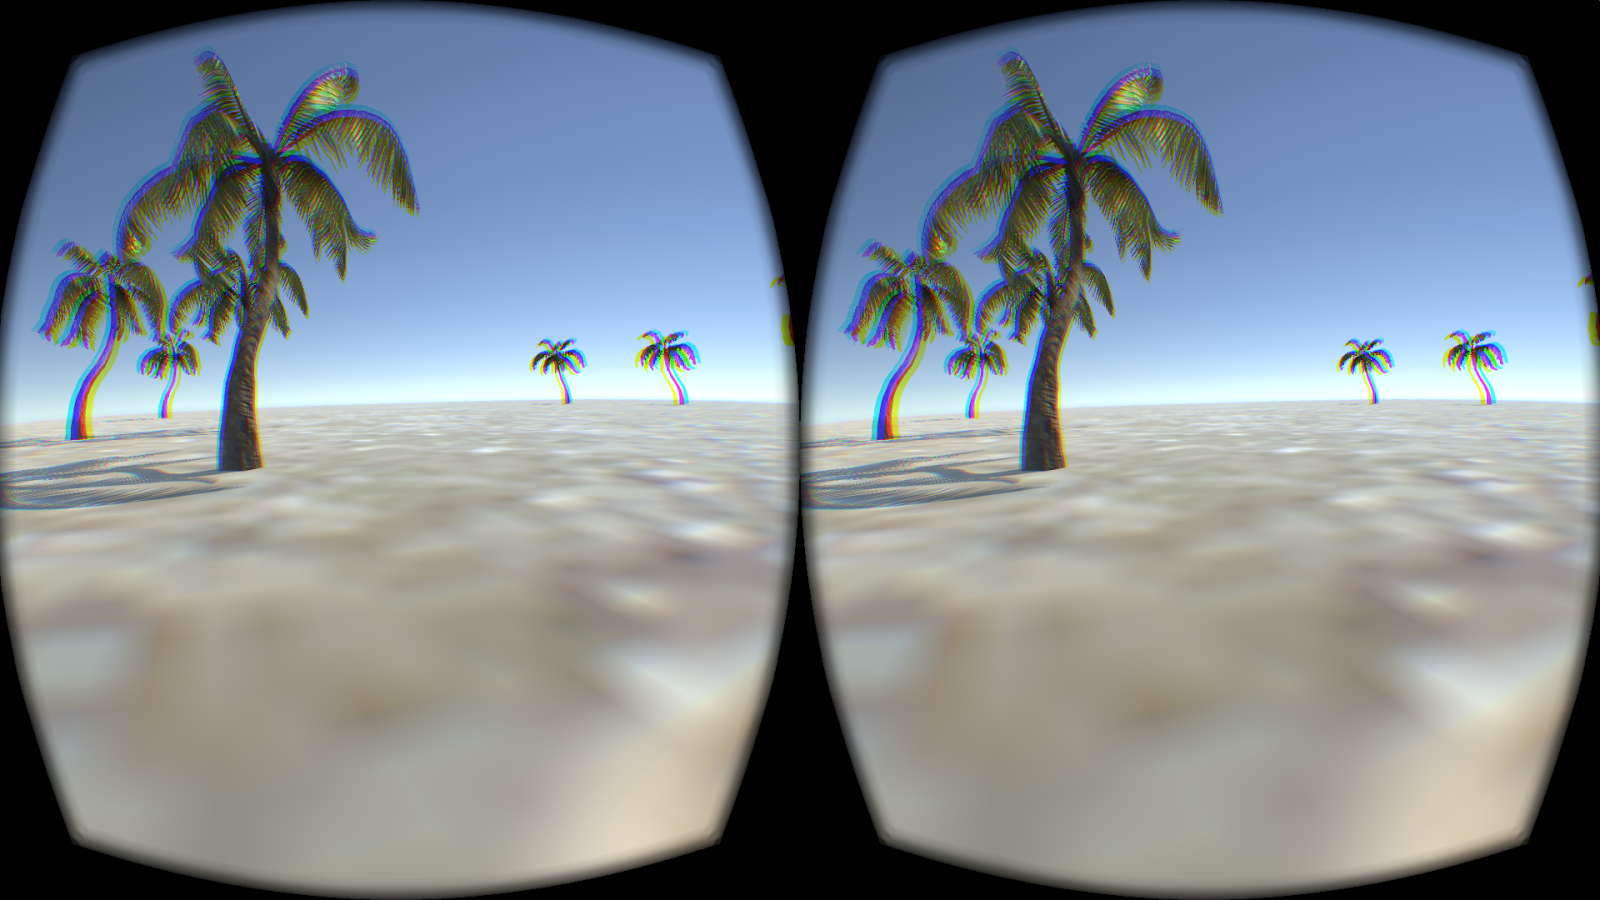
I used the same sample scene I’ve used in all my previous tests, a simple beach scene with a few palm trees created using assets from the Unity standard asset Environment package along with a single camera located at 0, 1, 0.

The example scene

To run the scene on the Rift, I selected Edit > Project Settings > Player > Other Settings and made sure that Virtual Reality Supported was checked.

Player Settings for VR

That done, with the Rift plugged in, I pressed Play in the Editor and was able to see the scene both in the Editor window and on the Rift (with the 0.7 runtime and Unity 5.2, direct mode works in the Editor).  As I moved the headset around, I could see that head tracking was enabled and with the Rift on, I could look anywhere I wanted in the scene. Two differences to note between the Editor view and the Rift view: first, the Editor preview is monoscopic and does not include lens correction, and second,  the Oculus Health and Safety warning is visible in the Rift view, but not visible in the Editor window.

With only a camera in the scene and no scripts for navigation, I couldn’t move anywhere. So, my next step was to add a player character.

Adding a player character to navigate the scene

The first option for quickly adding a player character I looked at was to use the first-person player character prefab  from the Unity standard assets Characters package. After downloading this package, I  simply dragged the FPSController prefab onto the scene and pressed play. This worked, but even though I've been using VR for a while and have my "VR Legs," I still found the default speeds for this controller fairly uncomfortable. 

After a break, I took a look at a second option: using the first-person player character prefab (OVRPlayerController) found in the  Oculus Utilities for Unity package. This package contains a variety of scripts and utilities that can be used to improve the VR experience (which I’ll be looking at in future posts) along with the first-person player character prefab.

The OVRPlayerController prefab from the Oculus Utilities for Unity package is a basic character controller that uses A, S, D, W controls.  The default speeds were slower than the first option I tried and, for me, were much more comfortable to use. In addition, like versions of this prefab from the older integration package, it includes a menu of diagnostic information you can view by pressing the space bar. 

Using this menu, I saw that I was easily getting 75 FPS for my sample scene.  A good start.  One issue I noticed though, was that while running the scene with the player prefab from the Oculus Utilities for Unity package, the console would sometimes be spammed with following error:

Quaternion To Matrix conversion failed because input Quaternion is invalid {0.000000, 0.000000, 0.000000, 0.000000} l=0.000000
UnityEngine.Matrix4x4:TRS(Vector3, Quaternion, Vector3)
OVRTrackerBounds:Update() (at Assets/OVR/Scripts/Util/OVRTrackerBounds.cs:151)


Looking on the forums, this does not appear to be a serious issue, and word is it should be fixed in an upcoming release.

Now that I had a VR scene that I could navigate, the next step was to do a test build and run.

Building and running the test application

In previous versions, building a VR application resulted in two executables: <application>_DirectToRift.exe and <application>.exe.  Now there is just one: <application>.exe.

I first tried just selecting File > Build Settings > Build and Run but this didn't work as the application failed to run. I then built the application and ran the executable by clicking on it and that worked fine.

Wednesday, June 3, 2015

Unity + Leap: Raising Your Hand to Get a Character's Attention

A common interaction in real life is to raise your hand to get someone’s attention. We do it when we are meeting someone in a crowd to help them find us, we do it when we are at school to get the teacher’s attention, and we do it as parents to get our child’s attention so they know that we are there and watching. We also do it when we want to hail a cab or make a bid at an auction. It is a simple enough interaction that babies do it almost instinctively. As simple as raising your hand is, using it as a mechanic in a VR environment brings up some interesting questions. How high should the user raise their hand to trigger the interaction? How long does the user need to have their hand raised? And, what should happen if the application loses hand tracking?

To experiment with this interaction, I created a demo consisting of a single character idling, minding his own business. When the user raises their hand, the character waves back and a speech bubble appears saying “Hello, there!”


Let’s take a look at the demo setup and then look at how testing the user experience went.

Setup

To create the scene I used basic 3D objects (planes, cubes) and a directional light to create a simple room. The character in the scene is a a rigged human character ("Carl") from the Male Character Pack by Mixamo. The speech bubble is created using a world space canvas (see: Thought Bubbles in a Rift scene).  To get my hands in the scene, I used the LeapOVRPlayerController from the Leap Unity Core Assest v.2.2.4 (see: Seeing your hands in VR).

For the character animation, I used the Idle and Wave animations from the Raw Mocap data package for Macanim by Unity Technologies (free animations created from motion capture data) and I created an animation controller for the character to control when he is idling and when he waves back at you. The animation controller has two animation states, Idle and Wave. It also has two triggers that can be used to trigger the transition between each state:


The animation controller for the waving
 character has two states and two triggers.

And, of course, I wrote a script (wavinghello.cs) to detect when the user has raised their hand. The interesting bit of this script is how you know where the user’s hands are and how you know when a hand has been raised high enough  so that you can trigger the appropriate animation. Let's take a look at the script's Update() function:

void Update () {
        HandModel[] userHands = handController.GetAllPhysicsHands(); 
        if (userHands.Length > 0){
          foreach (HandModel models in userHands){

            if (models.GetPalmPosition().y >= centerEyeAnchor.transform.position.y){
                 anim.SetTrigger("Wave");
                 changeMenuDisplay(speechbubble, 1);
             } else {
                 anim.SetTrigger("Idle");
                 changeMenuDisplay(speechbubble, 0);
             }
          }

        } else {
            anim.SetTrigger("Idle");
            changeMenuDisplay(speechbubble, 0);
        }
    }


To get the all of the hands in the scene, the script uses GetAllPhysicsHands() 
from HandController.cs:

  HandModel[] userHands = handController.GetAllPhysicsHands();

GetAllPhysicsHands() returns an array of all Leap physics HandModels for the specified HandController. To get each hand's position, the script uses  GetPalmPosition() which returns the Vector3 position of the HandModel relative to the HandController. The HandController is located at 0, 0, 0 relative to its parent object, the CenterEyeAnchor.

The HandController is a child
 of the CenterEyeAnchor.
The HandController is located at 0, 0, 0
relative to its parent the CenterEyeAnchor.

The CenterEyeAnchor object is used by the Oculus Rift integration scripts to maintain a position directly between the two eye cameras.  As the cameras are the user’s eyes, if the Y value of a HandModel object's position is greater than the Y value of the centerEyeAnchor, we know the user's hand has been raised above eye level.

The user experience

When testing this demo I was looking at how high the user should raise their hand to trigger the interaction, how long the user should have their hand raised, and, what the application should do when it loses hand tracking. Initially, I went with what seemed comfortable for me. I required the users to raise their hand (measured from the center of their palm) to above eye level and I did not require the user's hand to be raised for any specific amount of time. If the Leap lost hand tracking, the application treated it as though all hands were below eye level.

I then grabbed three people to do some testing. The only instruction I gave them was to “raise your hand to get the guy’s attention.” For my first user, the demo worked quite well. He raised his hand and the character waved back as expected. Great so far. My second user was resistant to raising his hand any higher than his nose. He quickly got frustrated as he could not get the guy’s attention. My third user raised his hand and then waved it wildly around so much so that the speech bubble flickered and was unreadable. Quite a range of results for only three users.

For my next iteration, I set  the threshold for raising one’s hand a few centimeters below eye level.

models.GetPalmPosition().y >= centerEyeAnchor.transform.position.y - 0.03f


This worked for my second user as it was low enough that he would trigger the interaction, but not so low that he would accidentally trigger it.

I haven’t done anything to address the third user yet, but whatever I do, waving my hands like a maniac is now part of my my own testing checklist.

I’d love to hear if anyone else is using this type of mechanic and what their experiences are. 

Thursday, April 2, 2015

Unity + Leap: Hand Selection UI Prototype

Immersion is definitely affected by how closely your avatar's hand looks like your own.  In the demo I am working on I want the user to be able to select the hands they have in the game before entering the game.  A prototype in-game UI for hand selection is seen in the video below.


To create this UI, I created a world space canvas and added buttons for each of the available hands. To each button, I added a box collider as a child object. A script attached to the box collider detects when a hand has collided with it.  To detect a hand, I used the Leap libraries and then checked to see if the collision object is a Leap HandModel.

In this prototype UI, I am using large buttons for two reasons. First, reading small text in the Rift can be difficult, and second, while using the Leap allows me to see my hands, in my experience, it does not track finger motion well enough for detailed interactions to be effective. In several of the tests I ran, the user's hand was generally in the right place but the fingers more often than not were at different angles than the user's actual hand. The effect was that my users seemed to have the fine motor skills of a toddler - they could reach out and touch everything but they didn't have a lot of control. On the positive side, when the user has hands in the game, it appears to be very natural for users to try to touch items with their hands. Even when users don't have visible hands in the scene, you'll often see them reaching out to try to touch things. While I have the start button say "Touch to Start," once users know to use their hand to affect the scene they get it right away and don't need prompting or other instruction.

Leap Motion has just released a "Best Practices Guide" and I'll be looking at incorporating many of the ideas documented there in future prototypes.

Tuesday, March 24, 2015

Unity: Mac Direct to Rift Plugin by AltspaceVR

When using the Rift on a Mac, Oculus recommends using extended mode for the monitor configuration as it provides better performance.  And while performance is indeed much better in extended mode (running the Tuscany demo in extended mode I get 75 FPS and in mirrored mode with the refresh rate set to 75 hertz I was get 46 FPS and with the refresh rate set to 60 I get 60 FPS), getting the app to run on the extended portion of the desktop can be a bit of a pain. 

To help provide a better Mac user experience, the folks at AltspaceVR have created a plugin that can be integrated into your Unity project so that your application can be launched seamlessly on to the Rift when using a Mac. They have kindly made this project available on github.

Friday, March 6, 2015

Quick Look: Unity 5 and the Oculus Unity 4 Integration Package 0.4.4

I downloaded Unity 5 yesterday and gave it a quick trial run with the Oculus Integration Package 0.4.4 for the DK2. To test it out, I first built a quick sample scene using assets found in the Unity standard asset packages. Using that scene, I then tried two methods for getting the scene onto the Rift:
  • Using the OVRPlayerController prefab 
  • Using the First Person Controller prefabs and scripts found in the Unity Standard Assets with the OVRCameraRig prefab
Here’s how those experiments went.

Creating the sample scene

I created a similar sample scene to the one I’ve been using for previous tests - a beach scene using only Unity standard assets. Unity 5 includes a significant refresh of the standard asset packages which is very cool. And nicely for me, they still include palm trees and a sand texture. One change of note is that skyboxes are now set in Window ->Lighting instead of Edit -> Render Settings. Unity 5 comes with a single default skybox which is what I used in this scene. Unity 5 doesn’t include a skyboxes standard asset package, at least not that I found. I did try using the SunnySky box material from the skyboxes package in 4.6 but it does not render nicely.
Beach scene created using Unity 5 standard assets 
Notice how  much prettier the palm trees are compared to the 4.6 assets.


Now to get the scene running in the Rift.

Using OVRPlayerController

After downloading and importing the Unity 4 Integration Package 0.4.4, the first thing I tried was just dropping the OVRPlayerController prefab into the scene. The OVRPlayerController character height is 2, so when placing the prefab in the scene I made sure to set the Y value to 1 so it was not colliding with the beach plane. And unlike 4.6, the palm tree assets have colliders attached, so I also made sure my player was placed so that it was not colliding with a palm tree.*

However, before I could build the scene, I needed to address the two errors I was getting:

Assets/OVR/Scripts/Util/OVRMainMenu.cs(250,43): error CS0117: `UnityEngine.RenderMode' does not contain a definition for `World'
Assets/OVR/Scripts/Util/OVRMainMenu.cs(969,43): error CS0117: `UnityEngine.RenderMode' does not contain a definition for `World
'

To get the scene to build, I edited OVRMainMenu.cs and changed:

c.renderMode = RenderMode.World;
to

c.renderMode = RenderMode.WorldSpace;

in the two places where that line occurs. With that done, I was a able to build and run the scene on the DK 2.

Beach scene on the Rift

Running this on a MacBook Pro in mirrored mode I was seeing 60 or so FPS, and in extended mode around 75.

*Actually, I didn’t make sure of that on the first test and at the start of the scene the collision caused the scene to jitter around and it was very unpleasant.

Using the OVRCameraRig with the first person character controller prefabs from the standard assets

My next test was to try to use the OVRCameraRig prefab with the first person character controller from the standard assets. This did not go as well.  With 5.0, there are two First Person Player prefabs: FPSController and RigidbodyFPSController.


The FPSController prefab

The FPSController prefab uses the FirstPersonController.cs script. This script has a number of options, including footstep sounds, head bob and FOV Kick. These options can be great in traditional games but for VR, they can be rather problematic. Head bob and FOV Kick are particularly concerning as these types of motion can be severe motion sickness triggers for some user. Based on that, I didn’t want to spend too much time trying to adapt this script. Instead, I looked at the RigidBodyFPSController.

RigidBodyFPSController

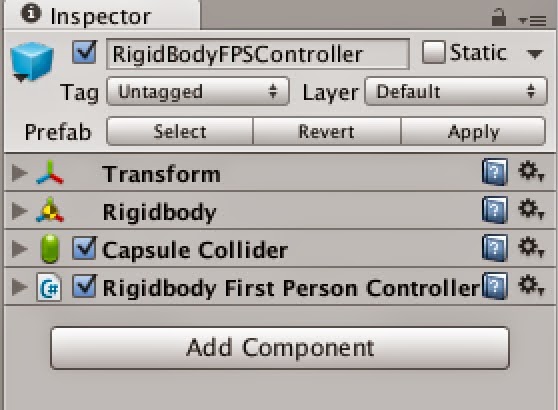
The RigidBodyFPSController prefab consists of the RigidBodyFPSController object with the MainCamera as a child object.


Looking a the RigidBodyFPSController object, you can see that it has a RigidBody, a Capsule Collider and the Rigidbody first person controller script.


To adapt this prefab for use in VR, I first deleted the MainCamera child object and then added the OVRCameraRig in its place.


Note: The MainCamera had a headbob.cs script attached to it. Head bob isn’t something I want in my VR application, and the documentation says that script can be safely disabled or removed.

The Rigidbody First Person Controller script’s Cam variable had been set to the MainCamera. With the MainCamera removed, in the inspector for the script I set it to LeftEyeAnchor.


I then gave the it a test run.

I was seeing similar FPS as in the OVRPlayerController test but the scene was noticeably more jittery. This may be due to using LeftEyeAnchor as the camera but it would require more research to know what is really going on.


Update: March 30, 2015
The build errors appear to be fixed in the 0.5.0.1 Beta version of the Integration Package. When using  0.5.0.1 you need  make sure you have updated to the 0.5.0.1 Beta version of the Runtime Package for it to work. I was not able to build my project until I had updated the Runtime Package as well.

Wednesday, February 4, 2015

Unity 4.6: Silent conversation - Detecting head gestures for yes and no

One of the demos that I have really enjoyed is the “Trial of the Rift Drifter” by Aldin Dynamics. In this demo you answer questions by shaking your head for yes and no. This is a great use of the head tracker data beyond changing the user’s point of view. And it is a mechanic that I would like to add to my own applications as it really adds to the immersive feel.

As an example, I updated the thought bubbles scene I created earlier to allow a silent conversation with one of the people in the scene and this blog post will cover exactly what I did.


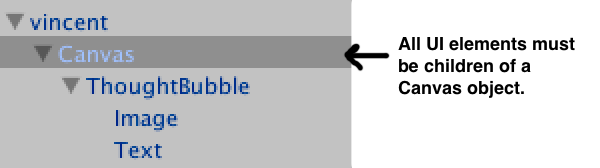
In my scene, I used a world-space canvas to create the thought bubble. This canvas contains a canvas group (ThoughtBubble) which contains an image UI object and a text UI object.

Hierarchy of the world space canvas  
I wanted the text in this canvas to change in response to the user shaking their head yes or no. I looked at a couple of different ways of detecting nods and head shakes, but ultimately went with a solution based on this project by Katsuomi Kobayashi.

To use the gesture recognition solution from this project in my own project, I first added the two Rift Gesture files (RiftGesture.cs and MyMath.cs) to my project and then attached the RiftGesture.cs script to the ThoughtBubble.

When you look at RiftGesture.cs, there are two things to take note of. First, you’ll see that to get the head orientation data, it uses:

OVRPose pose = OVRManager.display.GetHeadPose();
Quaternion q = pose.orientation;


This gets the head pose data from the Rift independent of any other input. When I first looked at adding head gestures, I tried using the transform from one of the cameras on the logic that the camera transform follows the head pose. Using the camera transform turned out to be problematic because the transform can also be affected by input from devices other than the head set (keyboard, mouse, gamepad) resulting in detecting a headshake when the user rotated the avatar using the mouse rather than shaking their head. By using OVRManager.display.GetHeadPose(), it ensures you are only evaluating data from the headset itself.

Second, you will also notice that it uses SendMessage in DetectNod() when a nod has been detected:

SendMessage("TriggerYes", SendMessageOptions.DontRequireReceiver);

and in DetectHeadshake() when a headshake has been detected:

SendMessage("TriggerNo", SendMessageOptions.DontRequireReceiver);

The next step I took was to create a new script (conversation.cs) to handle the conversation. This script contains a bit of setup to get and update the text in the canvas and to make sure that the dialog is visible to the user before it changes. (The canvas groups visibility is set by canvas groups alpha property.) However, most importantly, this script contains the TriggerYes() and TriggerNo() functions that receive the messages sent from the RiftGesture.cs. These functions simply update the text when a nod or headshake message has been received. I attached the conversation.cs script to the ThoughtBubble object and dragged the text object from the canvas to the questionholder so that the script would know which text to update.

Scripts attached to the ThoughtBubble canvas group

At this point I was able to build and test my scene and have a quick telepathic conversation with one of the characters.


Friday, January 9, 2015

Unity 4.6: Creating a look-based GUI for VR

In a previous post, I talked about creating GUIs for VR using world space canvases. In that example,   the GUI only displayed text - it didn't have any input components (buttons, sliders, etc). I wanted to add a button above each thought bubble the user could click to hear the text read aloud.  


As I had used a look-based interaction to toggle the visibility of the GUI, this brought up the obvious question of how do I use a similar interaction for GUI input?  And, importantly,  how do I do it in a way that takes advantage of Unity's GUI EventSystem?

Turns out, what's needed is a custom input module that detects where the user is looking. There is an excellent tutorial posted on the Oculus forums  by css that is a great place to start. That tutorial includes the code for a sample input module and walks you through the process of setting up the GUI event camera.  (You need to assign an event camera to each canvas and one twist is that the OVR cameras don’t seem to work with the GUI.) By following that tutorial, I was able to get look-based input working very quickly.

Note that while look-based interactions are immersive and fairly intuitive to use, it is worth keeping in mind that look-based input won’t work in all situations. For example, if you have attached the GUI to CenterEyeCamera  to ensure that the user always sees the GUI, the GUI will follow the user’s view meaning the user won’t be able to look at any one specific option.

Friday, December 12, 2014

Unity 4.6: Thought bubbles in a Rift scene using world space canvases

I’m really liking the new GUI system for 4.6. I had been wanting to play a bit with a comic-book style VR environment and with world space canvases,  and now is the time.


Here's a quick rundown of how I created the character thought bubbles in this scene using world space canvases.

Creating world space canvases

Canvases are the root object for all Unity GUI elements. By default they render to screen space but you also have the option of rendering the canvas in world space, which is exactly what you need for the Rift. To create a canvas, from the Hierarchy menu, select Create > UI > Canvas. When you create a canvas, both a Canvas object and an Event System object are added to your project. All UI elements need to be added as children of a Canvas. Each thought bubble consist of world-space Canvas, and two UI elements - an image and a text box. For organization, I put the UI elements in an empty gameObject called ThoughtBubble.


Note. Hierarchy order is important as UI objects are rendered in the order that they appear in the hierarchy.

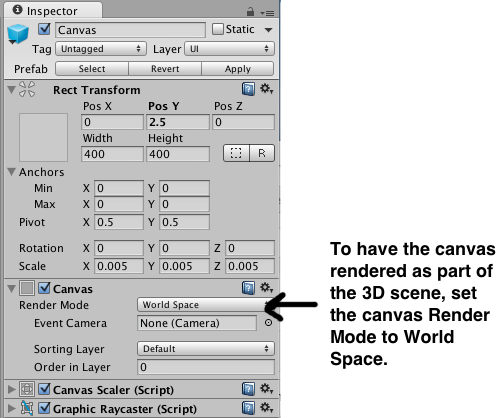
To have the canvas render as part of the 3d scene, in the Inspector for the Canvas, set the Render Mode to World Space.


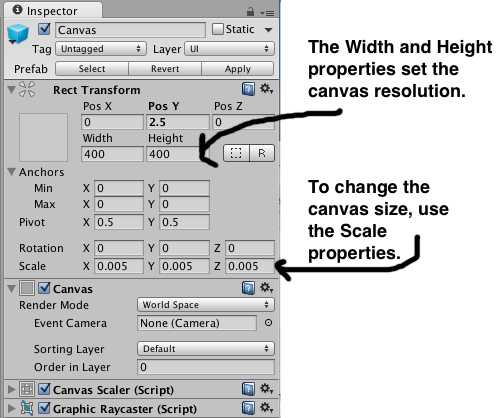
When you change the render mode to world space, you’ll note that the Rect Transform for the canvas becomes editable. Screen space canvases default to the size of the screen, however, for world space canvases you need to set the size manually to something appropriate to the scene.

Setting canvas position, size, and resolution

By default the canvas is huge. If you look in the Inspector, you'll see that it has Width and Height properties as well as Scale properties.  The height and width properties are used to control the resolution of the GUI.  (In this scene the Width and Height are set to 400 x 400. The thought bubble image is a 200 X 200 px image and the font used for the Text is 24pt Ariel.)  To change the size of the canvas you need to set the Scale properties. 


To give you an idea of the proportions, the characters in the scene are all just under 2 units high. and the scale of each canvas is set to 0.005 in all directions.  With the canvas a reasonable size, I positioned each canvas just above the character.

Rotating the canvas with the player's view

For the thought bubble to be read from any direction, I attached a script to the Canvas to set the canvas transform to look at the player .

using UnityEngine;
using System.Collections;

public class lookatplayer : MonoBehaviour {
    public Transform target;
    void Update() {
        transform.LookAt(target);
    }
}


Toggling canvas visibility

When you look at a character the thought bubble appears. The thought bubble remains visible until the you look at another character. There were two ways I looked at for toggling the menu visibility - setting the active state of the UI container gameObject (ThoughtBubble) or adding a Canvas Group component to the UI container gameObject and setting the Canvas Group's alpha property. Changing the alpha property seemed easier as I would not need to keep track of inactive gameObjects, so I went with that method.   There is a canvas attached to each character in the scene. The script below is attached to the CenterEyeObject (part of the OVRCameraRig prefab in the Oculus Integration package v. 0.4.4). It uses ray casting to detect which person the user is looking at and then changes the alpha value of the character's attached GUI canvas to toggle the canvas visibility.

using UnityEngine;
using System.Collections;

public class lookatthoughts : MonoBehaviour {
    
    private  GameObject displayedObject = null;
    private  GameObject lookedatObject  = null;


    // Use raycasting to see if a person is being looked 
    // at and if so, display the person's attached gui canvas
    void Update () {
        Ray ray = new Ray(transform.position, transform.forward);
        RaycastHit hit;

        if(Physics.Raycast(ray, out hit, 100)) {
            if (hit.collider.gameObject.tag == "person"){
                lookedatObject = hit.collider.gameObject;
                if (displayedObject == null){
                    displayedObject = lookedatObject;
                    changeMenuDisplay(displayedObject, 1);
                }else if (displayedObject == lookedatObject){
                    //do nothing
                }else{
                    changeMenuDisplay(displayedObject, 0);
                    displayedObject = lookedatObject;
                    changeMenuDisplay(displayedObject, 1);
                }
            }
        } 
    }

    // Toggle the menu display by setting the alpha value 
    // of the canvas group
    void changeMenuDisplay(GameObject menu, float alphavalue){

        Transform tempcanvas = FindTransform(menu.transform, "ThoughtBubble");

        if (tempcanvas != null){
            CanvasGroup[] cg;
            cg = tempcanvas.gameObject.GetComponents<CanvasGroup>();
            if (cg != null){
                foreach (CanvasGroup cgs in cg) {
                    cgs.alpha = alphavalue;
                }
            }
        }
    }
    

    // Find a child transform by name
    public static Transform FindTransform(Transform parent, string name)
    {
        if (parent.name.Equals(name)) return parent;
        foreach (Transform child in parent)
        {
            Transform result = FindTransform(child, name);
            if (result != null) return result;
        }
        return null;
    }
    
}

Wednesday, November 12, 2014

Unity 4: Knowing which user profile is in use

Previous versions of the Unity Integration package did not include a call for getting the user profile name. As of 0.4.3, it is now possible get the the user profile name. To know which profile is being used, you can use GetString()found in the OVRManager.cs script.

public string GetString(string propertyName, string defaultVal = null)

Below is a simple example script (report.cs) that uses this method to print out the name of the current user profile to the console. To use this script,  attach it to an empty game object in a scene that is using the OVRCameraRig or OVRPlayerController prefab. With the Rift connected and powered on, run the scene in the Unity Editor. If default is returned, no user profile has been found.


using UnityEngine;
using System.Collections;
using Ovr;

public class report : MonoBehaviour {
    void Start () {
     Debug.Log (OVRManager.capiHmd.GetString(Hmd.OVR_KEY_USER, "")) 
    }
}


The GetString()method found in the OVRManager.cs script method is used to get the profile values for the current HMD. The OVRManager.cs script gets a reference to the current HMD, capiHmd. The Hmd class, defined in OvrCapi.cs, provides a number of constants that you can use to get user profile information for the current HMD. In this example, I used OVR_KEY_USER to get the profile name. You could also get the user’s height (OVR_KEY_PLAYER_HEIGHT), IPD (OVR_KEY_IPD) or gender (OVR_KEY_GENDER), for example.

Friday, September 26, 2014

Unity: Playing a video on a TV screen at the start of a Rift application

Let’s say you wanted to have a TV screen that plays a short welcome video on start up in your scene, such as in this demo I'm working on:


Displaying video on a screen in a scene in Unity Pro is typically done using a Movie Texture. Movie Textures do not play automatically - you need to use a script to tell the video when to play. The Rift, however, presents some challenges that you wouldn’t face when working with a more traditional monitor that make knowing when to start the video a bit tricky.
  1. You can’t assume that the user has the headset on when the application starts. This means you can’t assume that the user can see anything that you are displaying. 
  2.  On start-up all Rift applications display a Health and Safety Warning (HSW). The HSW is big rectangle pinned to the user’s perspective that largely obscures the user’s view of everything else in the scene.
  3. You aren’t in control of the where the user looks (or rather, you shouldn’t be - moving the camera for the user can be a major motion sickness trigger), so you can’t be sure the user is even looking at the part of the scene where the video will be displayed.
In my demo, I addressed the first two issues by making sure the HSW had been dismissed before I started the video. If the user has dismissed the HSW, it will no longer be in the way of their view and it is a good bet that if they dismissed the HSW, they have the headset on and are ready to start the demo. The third issue I addressed by making sure the video is in the user’s field of view before it starts playing.

Making sure the Health and Safety Warning (HSW) has been dismissed

The HSW says “Press any key to dismiss.” My first thought was to use the key press as the trigger for starting the video. Unfortunately this doesn’t quite work. The HSW must be displayed for a minimum amount of time before it can actually be dismissed - 15 seconds the first time it is displayed for a given profile and 6 seconds for subsequent times. The result was that often the key was pressed and the welcome video would start but the HSW had no yet gone away. I also wanted the video to replay if the user reloaded the scene. When the scene is reloaded, the HSW is not displayed, the user does not need to press a key and therefore the video would not start.

Fortunately, Oculus Unity Integration package provides a way to know if the HSW is still being displayed or not.
OVRDevice.HMD.GetHSWDisplayState().Displayed
The above will return true if the HSW is still on screen.

Making sure the video is in the player’s field of view

How you get the user to look at the video will depend a lot on what kind of scene you are using. You can, for example, put a TV in every corner of the room so that no matter which direction the user is looking, a screen is in view. Or, if you have only a single TV screen, you can use audio cues to get the get the user’s attention. (I haven't decided yet how I will get the user's attention in my demo.)

No matter how you get the player to look at where the video is playing, you can check that the video is within the user’s field of view by checking the video’s render state before playing the video using:
renderer.isVisible
The above will return true if the object (in this case, the TV screen) is currently being rendered in the scene.